ID-REDACT® - Manual
Table of Contents
1) ID-REDACT® Help Manual
2) Registering to Use ID-REDACT®.
3) ID-REDACT® Login.
4) ID-REDACT® Subscription Plans.
5) ID-REDACT® Payment Details.
6) ID-REDACT® Dashboard.
7) ID-REDACT® Production Log.
8) ID-REDACT® Subscription Management
Welcome to the ID-REDACT® Help Manual! This guide will provide you with detailed information on how to use ID-REDACT®, a powerful tool developed by Data Safeguard AI to securely redact sensitive information from documents and images.
1. Introduction
ID-REDACT® is a state-of-the-art software solution designed to help individuals and organizations protect sensitive information by automatically redacting personally identifiable information (PII) and other confidential data from documents and images. Whether you need to comply with privacy regulations, safeguard customer information, or anonymize sensitive data for research purposes, ID-REDACT® offers a comprehensive and user-friendly solution.
2. Using ID-REDACT®
Uploading Documents
To redact sensitive information from a document using ID-REDACT®, follow these steps:
1. Launch ID-REDACT®.
2. Click on the "Upload" button or drag and drop your document into the application.
To redact sensitive information from a document using ID-REDACT®, follow these steps:
1. Launch ID-REDACT®.
2. Click on the "Upload" button or drag and drop your document into the application.
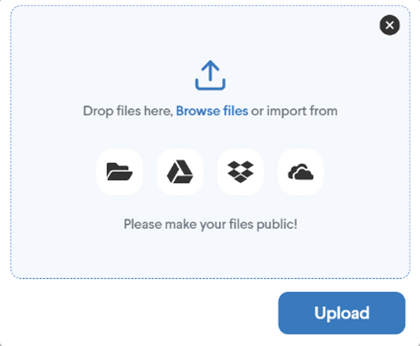
3. ID-REDACT® can redact files in the following formats: Word, Excel, PowerPoint, PDF, CSV.
4. Previously uploaded document(s) are displayed in the ‘Recent Files’ tile as Pending files.
4. Previously uploaded document(s) are displayed in the ‘Recent Files’ tile as Pending files.
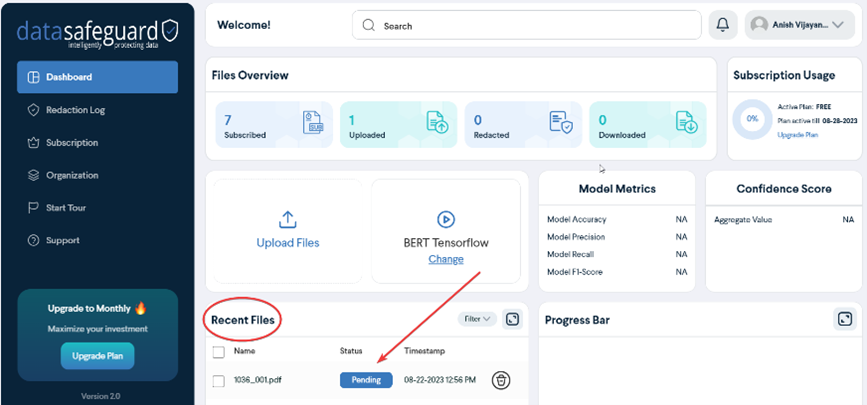
5. Wait for the document to notify you that it has finished processing.
Redacting Sensitive Information
ID-REDACT® uses advanced algorithms to automatically detect and redact sensitive information. To initiate the redaction process, follow these steps:
1) Once your document is uploaded and processed, select the desired file(s) in ‘Recent File’ tile.
2Click on the Change button to Select the Mode land then click on the play buttonto start the redactionprocess.

3) The ‘In Progress’ tile displays the progress of Redaction.
Previewing Redacted Document /Redaction Certificate
To Preview a document:
1) Select the redacted document in Recent Files
2) click on the “Open” button on the sliding panel to view the redacted document.
To Preview a document:
1) Select the redacted document in Recent Files
2) click on the “Open” button on the sliding panel to view the redacted document.

3) Select Redaction Document to preview Redaction Document.
4) Select Redaction Certificate to preview Redaction Certificate.
4) Select Redaction Certificate to preview Redaction Certificate.

Saving Redacted Document / RedactionCertificate
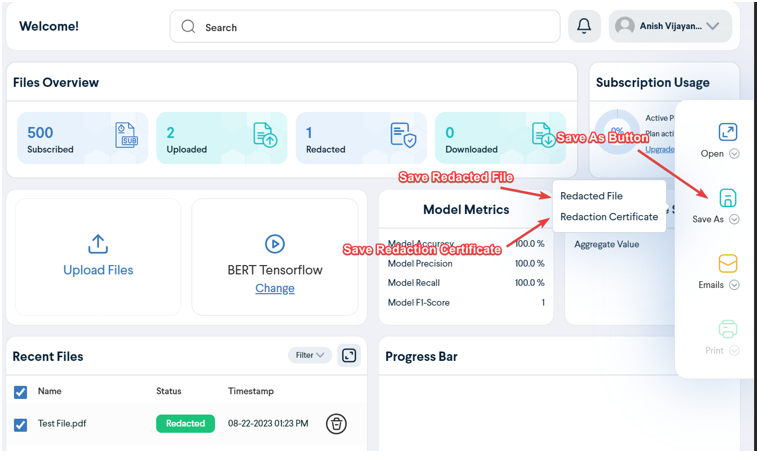
To Save a document:
1) select the redacted document in ‘Recent Files’
2) click on the "Save as" button on the sliding panel to view the redacted document.
3) Select Redaction Document to save Redaction Document.
4) Select Redaction Certificate to save Redaction Certificate.
5) Rename the file name if required.
Print Redacted Document / Redaction Certificate
To Print a document:
1) select the redacted document in Recent Files
2) click on the "Print" button to view the redacted document.
3) Select Redaction Document to preview Redaction Document.
4) Select Redaction Certificate to preview Redaction Certificate.
5) Enter an Email to send the file to.
To Print a document:
1) select the redacted document in Recent Files
2) click on the "Print" button to view the redacted document.
3) Select Redaction Document to preview Redaction Document.
4) Select Redaction Certificate to preview Redaction Certificate.
5) Enter an Email to send the file to.
Files Storage limits
1) Files Will be stored for no more than 24 hours.
2) All redacted files need to be saved to the customer’s location for safe keeping.
1) Files Will be stored for no more than 24 hours.
2) All redacted files need to be saved to the customer’s location for safe keeping.
Search/Filter Capability
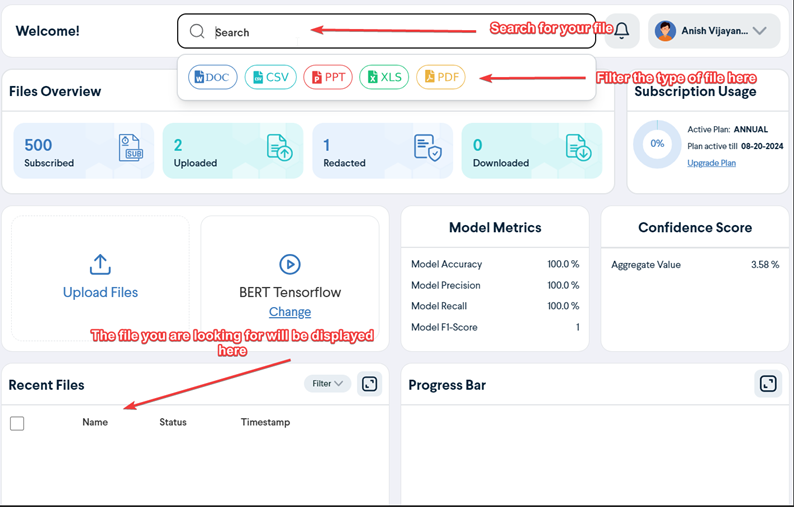
1) Any File in the ‘Recent Files’ tile can be searched or sorted by clicking on the search bar on the top of the dashboard.
2) Filtering the list of files in the ‘Recent Files’ can also be done based on the time criteria in the Filter dropdown.
1) Any File in the ‘Recent Files’ tile can be searched or sorted by clicking on the search bar on the top of the dashboard.
2) Filtering the list of files in the ‘Recent Files’ can also be done based on the time criteria in the Filter dropdown.
Redaction Log
1) Redaction Log captures the activity that happened after the documents have been redacted.
2) The User can search based on the File Name and/or Date Range of the log entry.
1) Redaction Log captures the activity that happened after the documents have been redacted.
2) The User can search based on the File Name and/or Date Range of the log entry.

3. Troubleshooting
If you encounter any issues while using ID-REDACT®, refer to the Troubleshooting section in the online help documentation available on the Data Safeguard AI website (www.datasafeguard.ai). The Troubleshooting section provides solutions to common problems and offers guidance on resolving technical issues.
If you require further assistance, you can contact our support team directly via email at hello@datasafeguard.ai. Please provide detailed information about the problem you are facing, including any error messages or screenshots if applicable. Our support team will respond to your inquiry as soon as possible.
If you require further assistance, you can contact our support team directly via email at hello@datasafeguard.ai. Please provide detailed information about the problem you are facing, including any error messages or screenshots if applicable. Our support team will respond to your inquiry as soon as possible.
4. Frequently Asked Questions
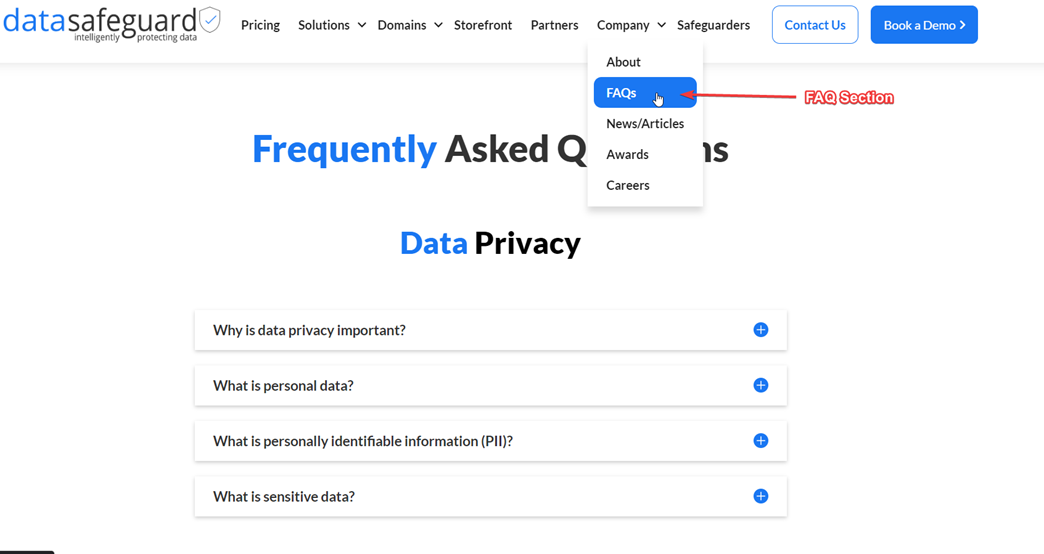
The Frequently Asked Questions (FAQ) section on the Data Safeguard AI website contains answers to commonly asked questions about ID-REDACT®. It is recommended to review the FAQ section to find quick answers to common queries.
5. Glossary
The Glossary section provides definitions of key terms and concepts related to ID-REDACT®. It serves as a reference to help you better understand the terminology used in the application.
To access the full features of ID-REDACT® and ensure a personalized experience, you need to register for an account. The registration process requires providing your name, organization, email address, and creating a password. This section will guide you through the registration process step by step.
Step 1: Accessing the Registration Page
1) Open your preferred web browser.
1) Open your preferred web browser.


2) Visit the ID-REDACT® website at datasafeguard.ai.
3) Go to our storefront and select the plan that you require by clicking on the register button.
3) Go to our storefront and select the plan that you require by clicking on the register button.
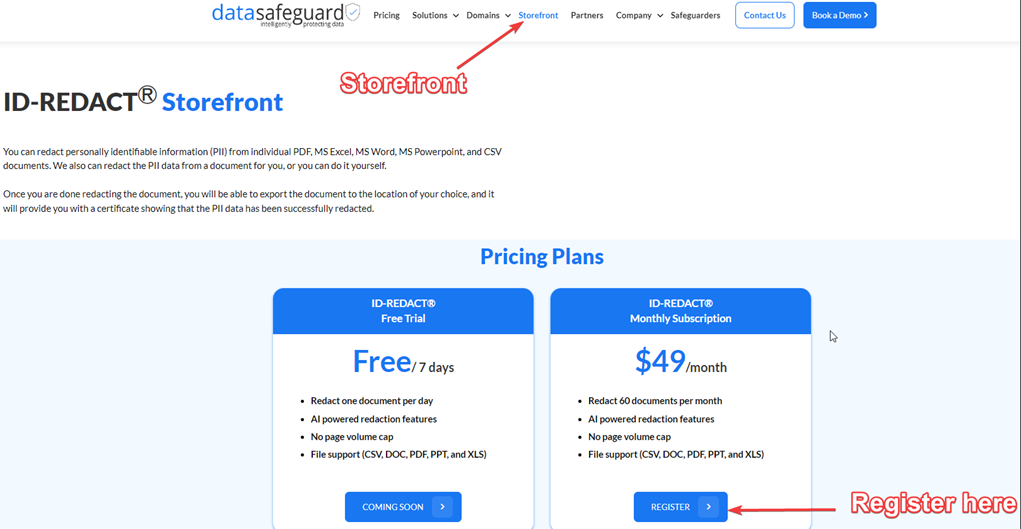
4) You will be redirected to the registration page.
Step 2: Providing Your Information
1) On the registration page, you will find a registration form.
2) Fill out the required information in the provided fields:
A) Name: Enter your full name as you would like it to appear on your account and communications.
B) Organization: Provide the name of your organization or affiliation. This field may be optional depending on the platform's requirements.
C) Email: Enter your valid email address. Make sure it is accurate and accessible as it will be used for important notifications and account-related communications.
D) Password: Choose a strong and secure password. It is recommended to use a combination of uppercase and lowercase letters, numbers, and special characters.
E) Verify Password: Re-enter your chosen password to ensure accuracy.
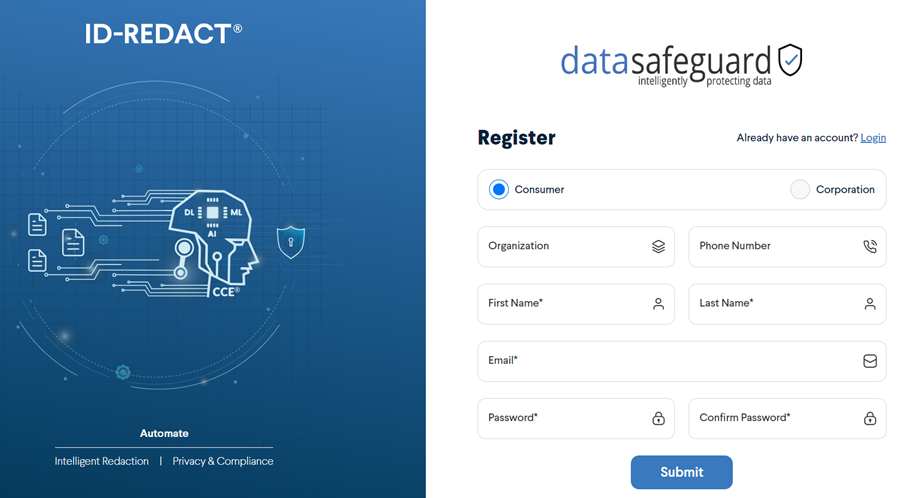
3) Carefully review your entered information to ensure accuracy before proceeding to the next step.
Step 3: Agreeing to Terms and Conditions
1) Read the Terms and Conditions or User Agreement provided on the registration page.
2) If you agree to the terms, check the box indicating your acceptance.
3) If there is an option to review the Privacy Policy, take the time to read it before proceeding.
4) Check the box indicating your consent to the Privacy Policy if applicable.
5) Some platforms may require you to confirm that you are of legal age or have the necessary authority to create an account. Follow the instructions provided.
Step 4: Submitting Your Registration
1) Once you have filled out all the required fields and agreed to the terms and conditions, click the "Register" or "Sign Up" button.
2) The system will send you an email for you to verify your email ID. It will also make sure that your password has good strength.
3) If any errors or omissions are found, the system will display an error message indicating the specific issue. Review the message and make the necessary corrections.
4) If all information is valid and accurate, you will be successfully registered and redirected to a confirmation page.
Step 5: Confirmation and Account Activation
1) After successfully registering, you will receive a confirmation email at the email address you provided during registration.
1) After successfully registering, you will receive a confirmation email at the email address you provided during registration.
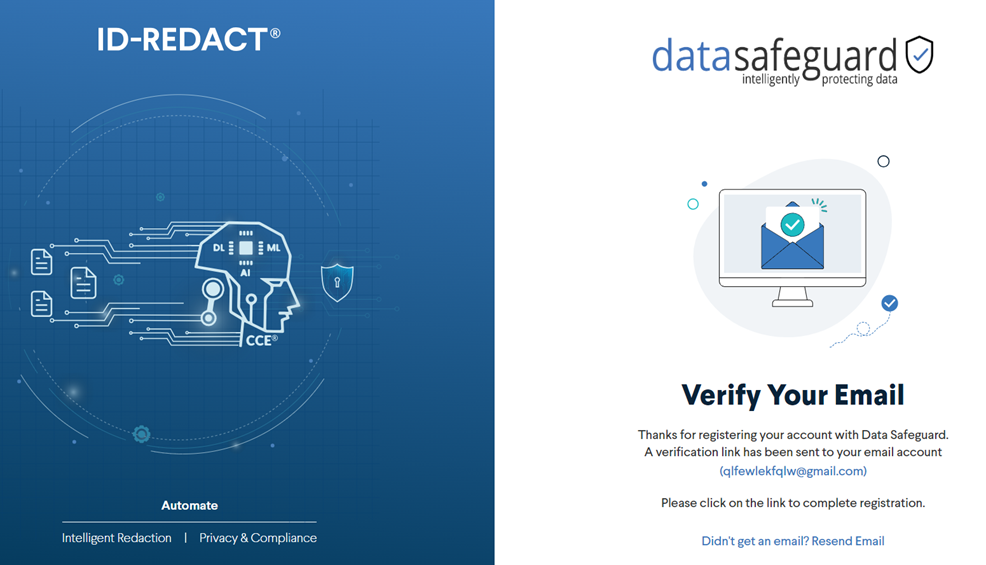
2) Access your email account and look for the confirmation email from ID-REDACT®.
3) Open the email and click on the confirmation or activation link provided.
4) You will be redirected to a page confirming that your account has been activated.
5) At this point, you can log in to ID-REDACT® using your registered email address and password.
3) Open the email and click on the confirmation or activation link provided.
4) You will be redirected to a page confirming that your account has been activated.
5) At this point, you can log in to ID-REDACT® using your registered email address and password.
Additional Assistance
If you encounter any issues or have questions during the registration process, please refer to the help documentation on the Data Safeguard AI website or contact our support team at hello@datasafeguard.ai. Our support team is available to assist you and address any concerns you may have.
If you encounter any issues or have questions during the registration process, please refer to the help documentation on the Data Safeguard AI website or contact our support team at hello@datasafeguard.ai. Our support team is available to assist you and address any concerns you may have.
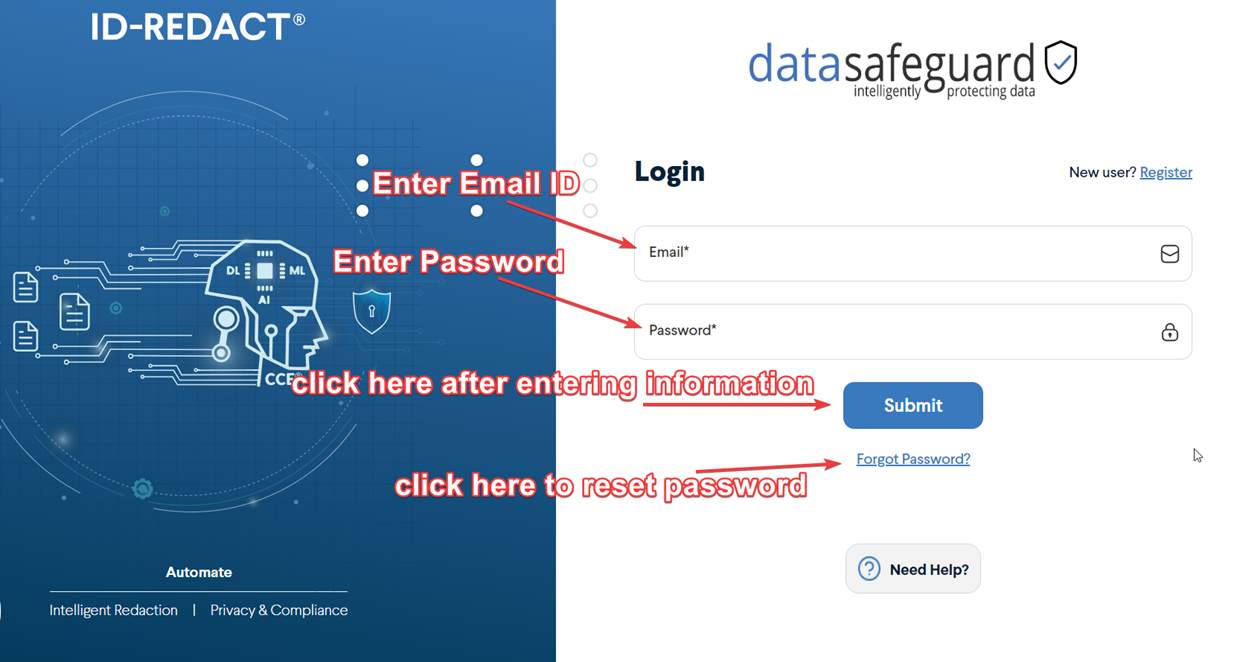
To access your ID-REDACT® account, please enter your registered email address and password in the login form. This section will guide you through the login process step by step.
Email
> Enter the email address associated with your ID-REDACT® account in the "Email" field.
> Make sure to use the same email address you used during the registration process.
> Check for any typos or errors in the email address before proceeding.
> Enter the email address associated with your ID-REDACT® account in the "Email" field.
> Make sure to use the same email address you used during the registration process.
> Check for any typos or errors in the email address before proceeding.
Password
> Enter your password in the "Password" field.
> Passwords are case-sensitive, so ensure that you enter it exactly as you created it during the registration process.
> If you're having trouble remembering your password, click on the "Forgot Password" link for assistance.
> Enter your password in the "Password" field.
> Passwords are case-sensitive, so ensure that you enter it exactly as you created it during the registration process.
> If you're having trouble remembering your password, click on the "Forgot Password" link for assistance.
Forgot Password
> If you have forgotten your password, click on the "Forgot Password" link.
> You will be directed to a password recovery page.
> Follow the instructions provided to reset your password.
> Typically, you will need to enter your registered email address to receive a password reset link via email.
> Click on the password reset link and follow the prompts to set a new password for your ID-REDACT® account.
Additional Assistance
If you continue to experience issues logging into your ID-REDACT® account or have any questions, please consult the help documentation on the Data Safeguard AI website or reach out to our support team at hello@datasafeguard.ai. Our support team is ready to assist you with any login-related concerns.
If you continue to experience issues logging into your ID-REDACT® account or have any questions, please consult the help documentation on the Data Safeguard AI website or reach out to our support team at hello@datasafeguard.ai. Our support team is ready to assist you with any login-related concerns.
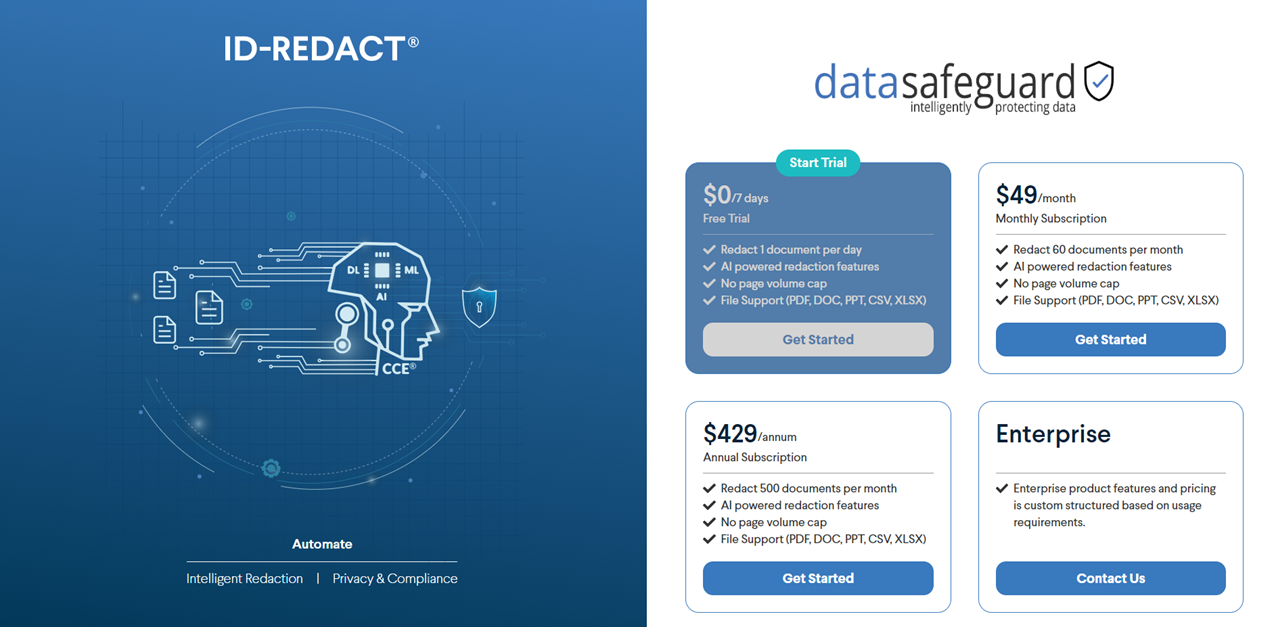
ID-REDACT® offers various subscription plans to cater to different user needs. Choose the plan that best suits your requirements and budget. This section will provide an overview of the available subscription plans to help you make an informed decision.
Free Plan
The Free Plan is designed for users who want to explore ID-REDACT® with basic features at no cost. Here are some key features of the Free Plan:
> Limited usage and access to advanced functionalities.
> Redact a set number of documents or images per month.
> Basic support.
The Free Plan is designed for users who want to explore ID-REDACT® with basic features at no cost. Here are some key features of the Free Plan:
> Limited usage and access to advanced functionalities.
> Redact a set number of documents or images per month.
> Basic support.
Monthly Plan
The Monthly Plan is a subscription option for users who need more flexibility and features monthly. Here are some key features of the Monthly Plan:
> Unlimited access to all ID-REDACT® features and functionalities.
> Redact an unlimited number of documents or images per month.
> Priority support with faster response times.
> Billed monthly.
Annual Plan
The Annual Plan provides a cost-effective solution for users who require long-term access to ID-REDACT®. Here are some key features of the Annual Plan:
> Same benefits as the Monthly Plan but at a discounted annual price.
> Redact an unlimited number of documents or images throughout the year.
> Priority support with faster response times.
> Billed annually, saving you money compared to the monthly subscription.
Enterprise Plan
The Enterprise Plan is tailored for organizations with specific requirements and larger-scale usage. It offers custom features, dedicated support, and flexible pricing options. To learn more about the Enterprise Plan, please contact our sales team at sales@datasafeguard.ai.
The Enterprise Plan is tailored for organizations with specific requirements and larger-scale usage. It offers custom features, dedicated support, and flexible pricing options. To learn more about the Enterprise Plan, please contact our sales team at sales@datasafeguard.ai.
Getting Started
Once you have chosen the right subscription plan for you, click on the "Get Started" or "Subscribe" button associated with your chosen plan. You will be redirected to the subscription page to complete the signup process.
Please Note: Subscription plans and features may be subject to change or availability. It is recommended to visit the DataSafeguard AI website for the most up-to-date information on subscription plans.
If you have any questions regarding the subscription plans or need assistance in selecting the appropriate plan, please reach out to our sales team at sales@datasafeguard.ai. They will be happy to assist you in making the right choice for your needs.
To complete your subscription purchase, please provide your payment details on this secure payment page. We take your security seriously and want to assure you that no financial personally identifiable information is stored by Data Safeguard. Instead, the information you provide will be securely transmitted to our trusted credit card processor for processing. This section will guide you through the required payment details.
Credit Card Owner's Name
> Enter the full name of the owner of the credit card in the designated field.
> Make sure to enter the name exactly as it appears on the credit card.
> Enter the full name of the owner of the credit card in the designated field.
> Make sure to enter the name exactly as it appears on the credit card.
Credit Card Number
> Enter the 16-digit credit card number in the provided field.
> Make sure to accurately enter the credit card number without any spaces or dashes.
> Enter the 16-digit credit card number in the provided field.
> Make sure to accurately enter the credit card number without any spaces or dashes.
Expiration Date
> Select the expiration month and year of your credit card from the respective dropdown menus.
> Choose the month and year that match the expiration date shown on your credit card.
> Select the expiration month and year of your credit card from the respective dropdown menus.
> Choose the month and year that match the expiration date shown on your credit card.
CCV Number
> The CCV (Card Verification Value) number is a 3-digit security code located on the back of most credit cards. > Enter the CCV number in the designated field.
> This code helps ensure the security and validity of your transaction.
> The CCV (Card Verification Value) number is a 3-digit security code located on the back of most credit cards. > Enter the CCV number in the designated field.
> This code helps ensure the security and validity of your transaction.
Billing Address
> Enter your billing address in the provided fields.
> This is the address associated with your credit card statement.
> Make sure to provide the accurate street address, city, state, ZIP code, and country.
> Enter your billing address in the provided fields.
> This is the address associated with your credit card statement.
> Make sure to provide the accurate street address, city, state, ZIP code, and country.
Phone Number
> Enter a valid phone number where you can be reached for any payment-related inquiries or notifications.
> Provide the phone number in the designated field.
> Include the country code if applicable.
> Enter a valid phone number where you can be reached for any payment-related inquiries or notifications.
> Provide the phone number in the designated field.
> Include the country code if applicable.
Submit
> After filling out all the required payment details, click the "Submit" or "Complete Purchase" button to proceed.
> Your payment details will be securely transmitted to the credit card processor for verification and processing.
> Please be patient while the payment is being processed. Do not refresh or navigate away from the page until the process is complete.
If you encounter any issues or have questions regarding the payment process, please consult the help documentation on the DataSafeguard AI website or contact our support team at hello@datasafeguard.ai. Our support team is available to assist you with any payment-related concerns.

Welcome to ID-REDACT®!
Thank you for choosing ID-REDACT®, a powerful tool developed by Data Safeguard AI for secure and efficient redaction of sensitive information. This guide will provide you with a brief overview of the steps to get started with ID-REDACT®. Let’s begin!
Option 1: Visit the Data Safeguard AI Website
> Open your preferred web browser.
> Go to datasafeguard.ai.
> Click on the link to start the ID-REDACT® application.
> Follow any instructions specific to your operating system.
> Once the Welcome page is present, you have successfully launched the ID-REDACT® application.
> Open your preferred web browser.
> Go to datasafeguard.ai.
> Click on the link to start the ID-REDACT® application.
> Follow any instructions specific to your operating system.
> Once the Welcome page is present, you have successfully launched the ID-REDACT® application.
Option 2: Enter Through a Marketplace
> If you were directed to ID-REDACT® through a marketplace (e.g., Microsoft Azure Marketplace or AWS Marketplace), follow the link provided.
> Proceed to the marketplace page for ID-REDACT®.
> Follow the instructions on the marketplace page to access and install ID-REDACT®.
> Once the installation is complete, launch the ID-REDACT® application.
Next Steps
Once you have connected to ID-REDACT®, you are ready to start securely redacting sensitive information from your documents and images. Familiarize yourself with the features and functionalities of ID-REDACT® by referring to this help manual or help documentation available within the application.
If you encounter any issues or need assistance while using ID-REDACT®, please consult the help documentation provided in the application or visit the Data Safeguard AI website for additional resources. You can also contact our support team at hello@datasafeguard.aifor further assistance.
Click "Next" to continue and explore the features and capabilities of ID-REDACT®!
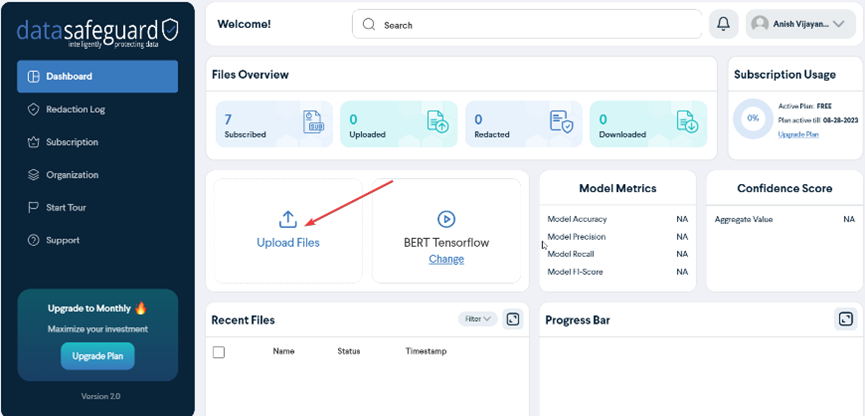
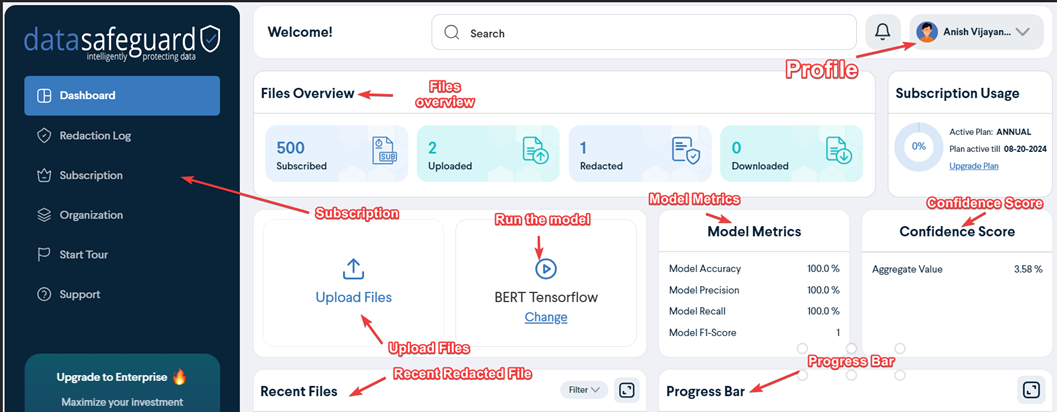
Welcome to the ID-REDACT® Dashboard! This comprehensive single page provides you with an overview of your profile, files, subscription details, and various functionalities. Let's explore the different sections of the dashboard.
Profile
> The Profile section displays your user information, such as your name, email address, and organization.
> You can update your profile details, change your password, or modify other relevant settings by clicking on the respective options.
> The Profile section displays your user information, such as your name, email address, and organization.
> You can update your profile details, change your password, or modify other relevant settings by clicking on the respective options.
Files Overview
> In the Files Overview section, you can view a summary of your uploaded files.
> It provides information such as the total number of files, the number of redacted files, and the remaining files in your subscription quota.
> In the Files Overview section, you can view a summary of your uploaded files.
> It provides information such as the total number of files, the number of redacted files, and the remaining files in your subscription quota.
Subscription
> The Subscription section provides details about your current subscription plan.
> It includes information such as the plan type (Free, Monthly, Annual, or Enterprise), renewal date, and any applicable usage limits.
> You can also manage your subscription, upgrade, or downgrade your plan, or view billing information from this section.
Upload File
> To upload a file for redaction, use the "Upload File" command.
> Click on the button or link provided to browse and select the file you want to redact.
> Follow the on-screen instructions to complete the file upload process.
> To upload a file for redaction, use the "Upload File" command.
> Click on the button or link provided to browse and select the file you want to redact.
> Follow the on-screen instructions to complete the file upload process.
Run the Model
> Once you have uploaded a file, you can initiate the redaction process by clicking on the "Run Model" or similar button.
> The model will automatically process the uploaded file, detect sensitive information, and perform redactions based on your settings.
> Once you have uploaded a file, you can initiate the redaction process by clicking on the "Run Model" or similar button.
> The model will automatically process the uploaded file, detect sensitive information, and perform redactions based on your settings.
Model Metrics
> The Model Metrics section provides information about the performance of the redaction model.
> It may include metrics such as accuracy, precision, recall, or F1 score, giving you insights into the model's effectiveness in identifying and redacting sensitive information.
> The Model Metrics section provides information about the performance of the redaction model.
> It may include metrics such as accuracy, precision, recall, or F1 score, giving you insights into the model's effectiveness in identifying and redacting sensitive information.
Confidence Score
> The Confidence Score represents the level of certainty that the redaction model has in its predictions.
> It can help you gauge the reliability of the redacted information.
> A higher confidence score generally indicates a higher level of certainty in the accuracy of the redactions.
> The Confidence Score represents the level of certainty that the redaction model has in its predictions.
> It can help you gauge the reliability of the redacted information.
> A higher confidence score generally indicates a higher level of certainty in the accuracy of the redactions.
Recent Redacted Files
> The Recent Redacted Files section displays a list of the most recently processed and redacted files.
> It allows you to quickly access and review the redacted versions of your documents.
> The Recent Redacted Files section displays a list of the most recently processed and redacted files.
> It allows you to quickly access and review the redacted versions of your documents.
Progress Bar
> The Progress Bar visually represents the progress of redaction for uploaded files.
> It indicates the status of each file being processed, such as "In Progress" or "Completed."
> You can monitor the progress of redaction for multiple files simultaneously through the Progress Bar.
> The Progress Bar visually represents the progress of redaction for uploaded files.
> It indicates the status of each file being processed, such as "In Progress" or "Completed."
> You can monitor the progress of redaction for multiple files simultaneously through the Progress Bar.
If you need further assistance or have any questions about using the ID-REDACT® Dashboard, please refer to the help documentation provided within the application or contact our support team at hello@datasafeguard.ai. Our support team is available to assist you with any inquiries or concerns.
ID-REDACT® Production Log
The ID-REDACT® Production Log provides a comprehensive view of the redaction activities and actions performed within the system. This single page displays a log of time stamps, file names, actions, usernames, and assigned tasks. Let's explore the different components of the Production Log.
Time Stamp
> The Time Stamp column indicates the date and time when a particular action or event occurred.
> It helps track the chronological order of activities within the ID-REDACT® system.
> The Time Stamp column indicates the date and time when a particular action or event occurred.
> It helps track the chronological order of activities within the ID-REDACT® system.
Name
> The File Name column displays the name or identifier of the file that was processed or affected by a specific action.
> It helps identify the files that have undergone redaction or any other relevant activities.
> The File Name column displays the name or identifier of the file that was processed or affected by a specific action.
> It helps identify the files that have undergone redaction or any other relevant activities.
Action
> The Action column provides a description of the specific action or event that took place.
> It includes information about tasks performed, such as file uploads, redactions, downloads, or any other relevant actions.
> The Action column provides a description of the specific action or event that took place.
> It includes information about tasks performed, such as file uploads, redactions, downloads, or any other relevant actions.
Username
> The Username column indicates the name or identifier of the user who initiated or performed the action.
> It helps identify the individual responsible for a particular task or activity within the ID-REDACT® system.
> The Username column indicates the name or identifier of the user who initiated or performed the action.
> It helps identify the individual responsible for a particular task or activity within the ID-REDACT® system.
Assigned
> The Assigned column displays any assigned tasks or responsibilities associated with specific files or actions.
> It provides information about who is responsible for completing or overseeing tasks.
> The Assigned column displays any assigned tasks or responsibilities associated with specific files or actions.
> It provides information about who is responsible for completing or overseeing tasks.
Searching and Filtering
> The Production Log may have search and filtering functionality to help you narrow down the displayed entries based on specific criteria.
> Look for search boxes, dropdown menus, or filtering options to refine the log view according to your requirements.
> The Production Log may have search and filtering functionality to help you narrow down the displayed entries based on specific criteria.
> Look for search boxes, dropdown menus, or filtering options to refine the log view according to your requirements.
If you need further assistance or have any questions about using the ID-REDACT® Production Log, please refer to the help documentation provided within the application or contact our support team at hello@datasafeguard.ai. Our support team is available to assist you with any inquiries or concerns related to the Production Log.

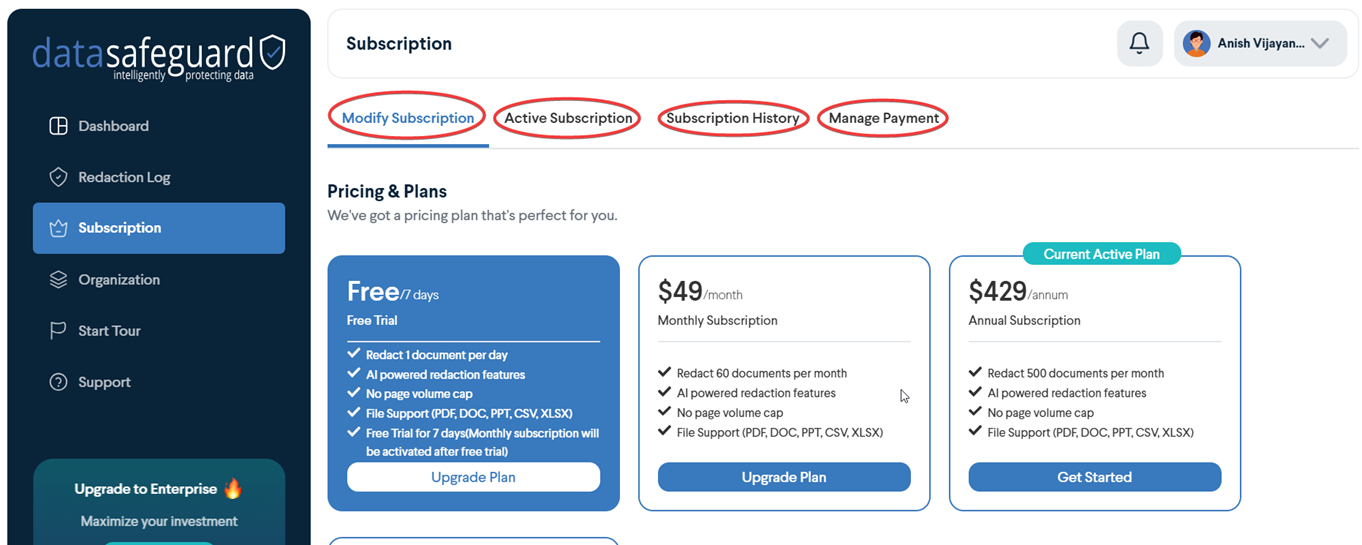
The ID-REDACT® Subscription Management page allows you to have full control over your subscription, including modifying pricing options, viewing your active subscription, accessing your subscription history, and managing your payments. This comprehensive single page provides you with the necessary tools to manage your subscription effectively. Let's explore the different sections available.
Modify / Enhance Pricing
> The Modify/Enhance Pricing section enables you to make changes to your existing subscription plan or explore different pricing options.
> You can upgrade your plan to gain additional features or benefits, or downgrade to a more suitable plan based on your requirements and budget.
> Follow the instructions provided to modify or enhance your pricing plan.
Active Subscription
> The Active Subscription section displays information about your current subscription.
> It includes details such as your plan type (Free, Monthly, Annual, or Enterprise), renewal date, and any applicable usage limits.
> You can review your subscription details and ensure that your plan meets your needs.
Subscription History
> The Subscription History section provides a comprehensive overview of your past subscription activities.
> It displays a record of your previous subscription plans, changes, upgrades, or downgrades.
> This section allows you to track and reference your subscription history over time.
> The Subscription History section provides a comprehensive overview of your past subscription activities.
> It displays a record of your previous subscription plans, changes, upgrades, or downgrades.
> This section allows you to track and reference your subscription history over time.
Manage Payments
> The Manage Payments section allows you to handle your payment information and billing details.
> You can update or modify your payment methods, view past payments, and manage your billing preferences. > Follow the instructions provided to manage your payment settings effectively.
> The Manage Payments section allows you to handle your payment information and billing details.
> You can update or modify your payment methods, view past payments, and manage your billing preferences. > Follow the instructions provided to manage your payment settings effectively.
If you require further assistance or have any questions related to subscription management, please consult the help documentation provided within the application or contact our support team at hello@datasafeguard.ai. Our support team is available to assist you with any inquiries or concerns regarding subscription management.
